New product – FairLife milk

Although I would prefer to have no commercials, I do watch them while fast forwarding. (Hint for advertisers: use text or images in same position so when viewing at 2-4x speed, it still makes sense.)  

The other night a commercial caught my eye and we backed it up and watched it at normal speed.  It was for FairLife milk. 
I was immediately interested to try it and so went to their website to find out more. 
They have implemented an innovative way to improve milk.  According to their site “The water, minerals, lactose, protein and fat in milk have five different sizes, so we use five different filters to separate them. Then we recombine them to create our unique ultra-filtered milks loaded with natural nutrition.” 

I’m excited about the milk because the sugars are half of regular milk.  The side benefits are the extra protein, calcium, and being lactose free. 

  
I’m a fan of everything they claim on their site. They even grow their own feed for their cows, and turn manure into CNG to power 42 tractor trailers! It’s nice to know innovation exists in farming and dairies.  
I’m excited about the milk because the sugars are half of regular milk.  The side benefits are the extra protein, calcium, and being lactose free.

Went to store and found it!  Target has it at $3.99 for 52 ounces (1.5 liter).  Publix is $4.19.  We bought 2% and chocolate. It tastes great, with just a tinge of powdered milk flavor. The chocolate is great. Best news is that  the sugars and calories for the chocolate milk are the same as regular milk.  Repeat: The sugars and calories for the chocolate milk are the same as regular milk.  The picture I included here shows the nutritional facts for 2% regular milk, FairLife chocolate, FairLife 2%, and Unsweetened Almond milk. 

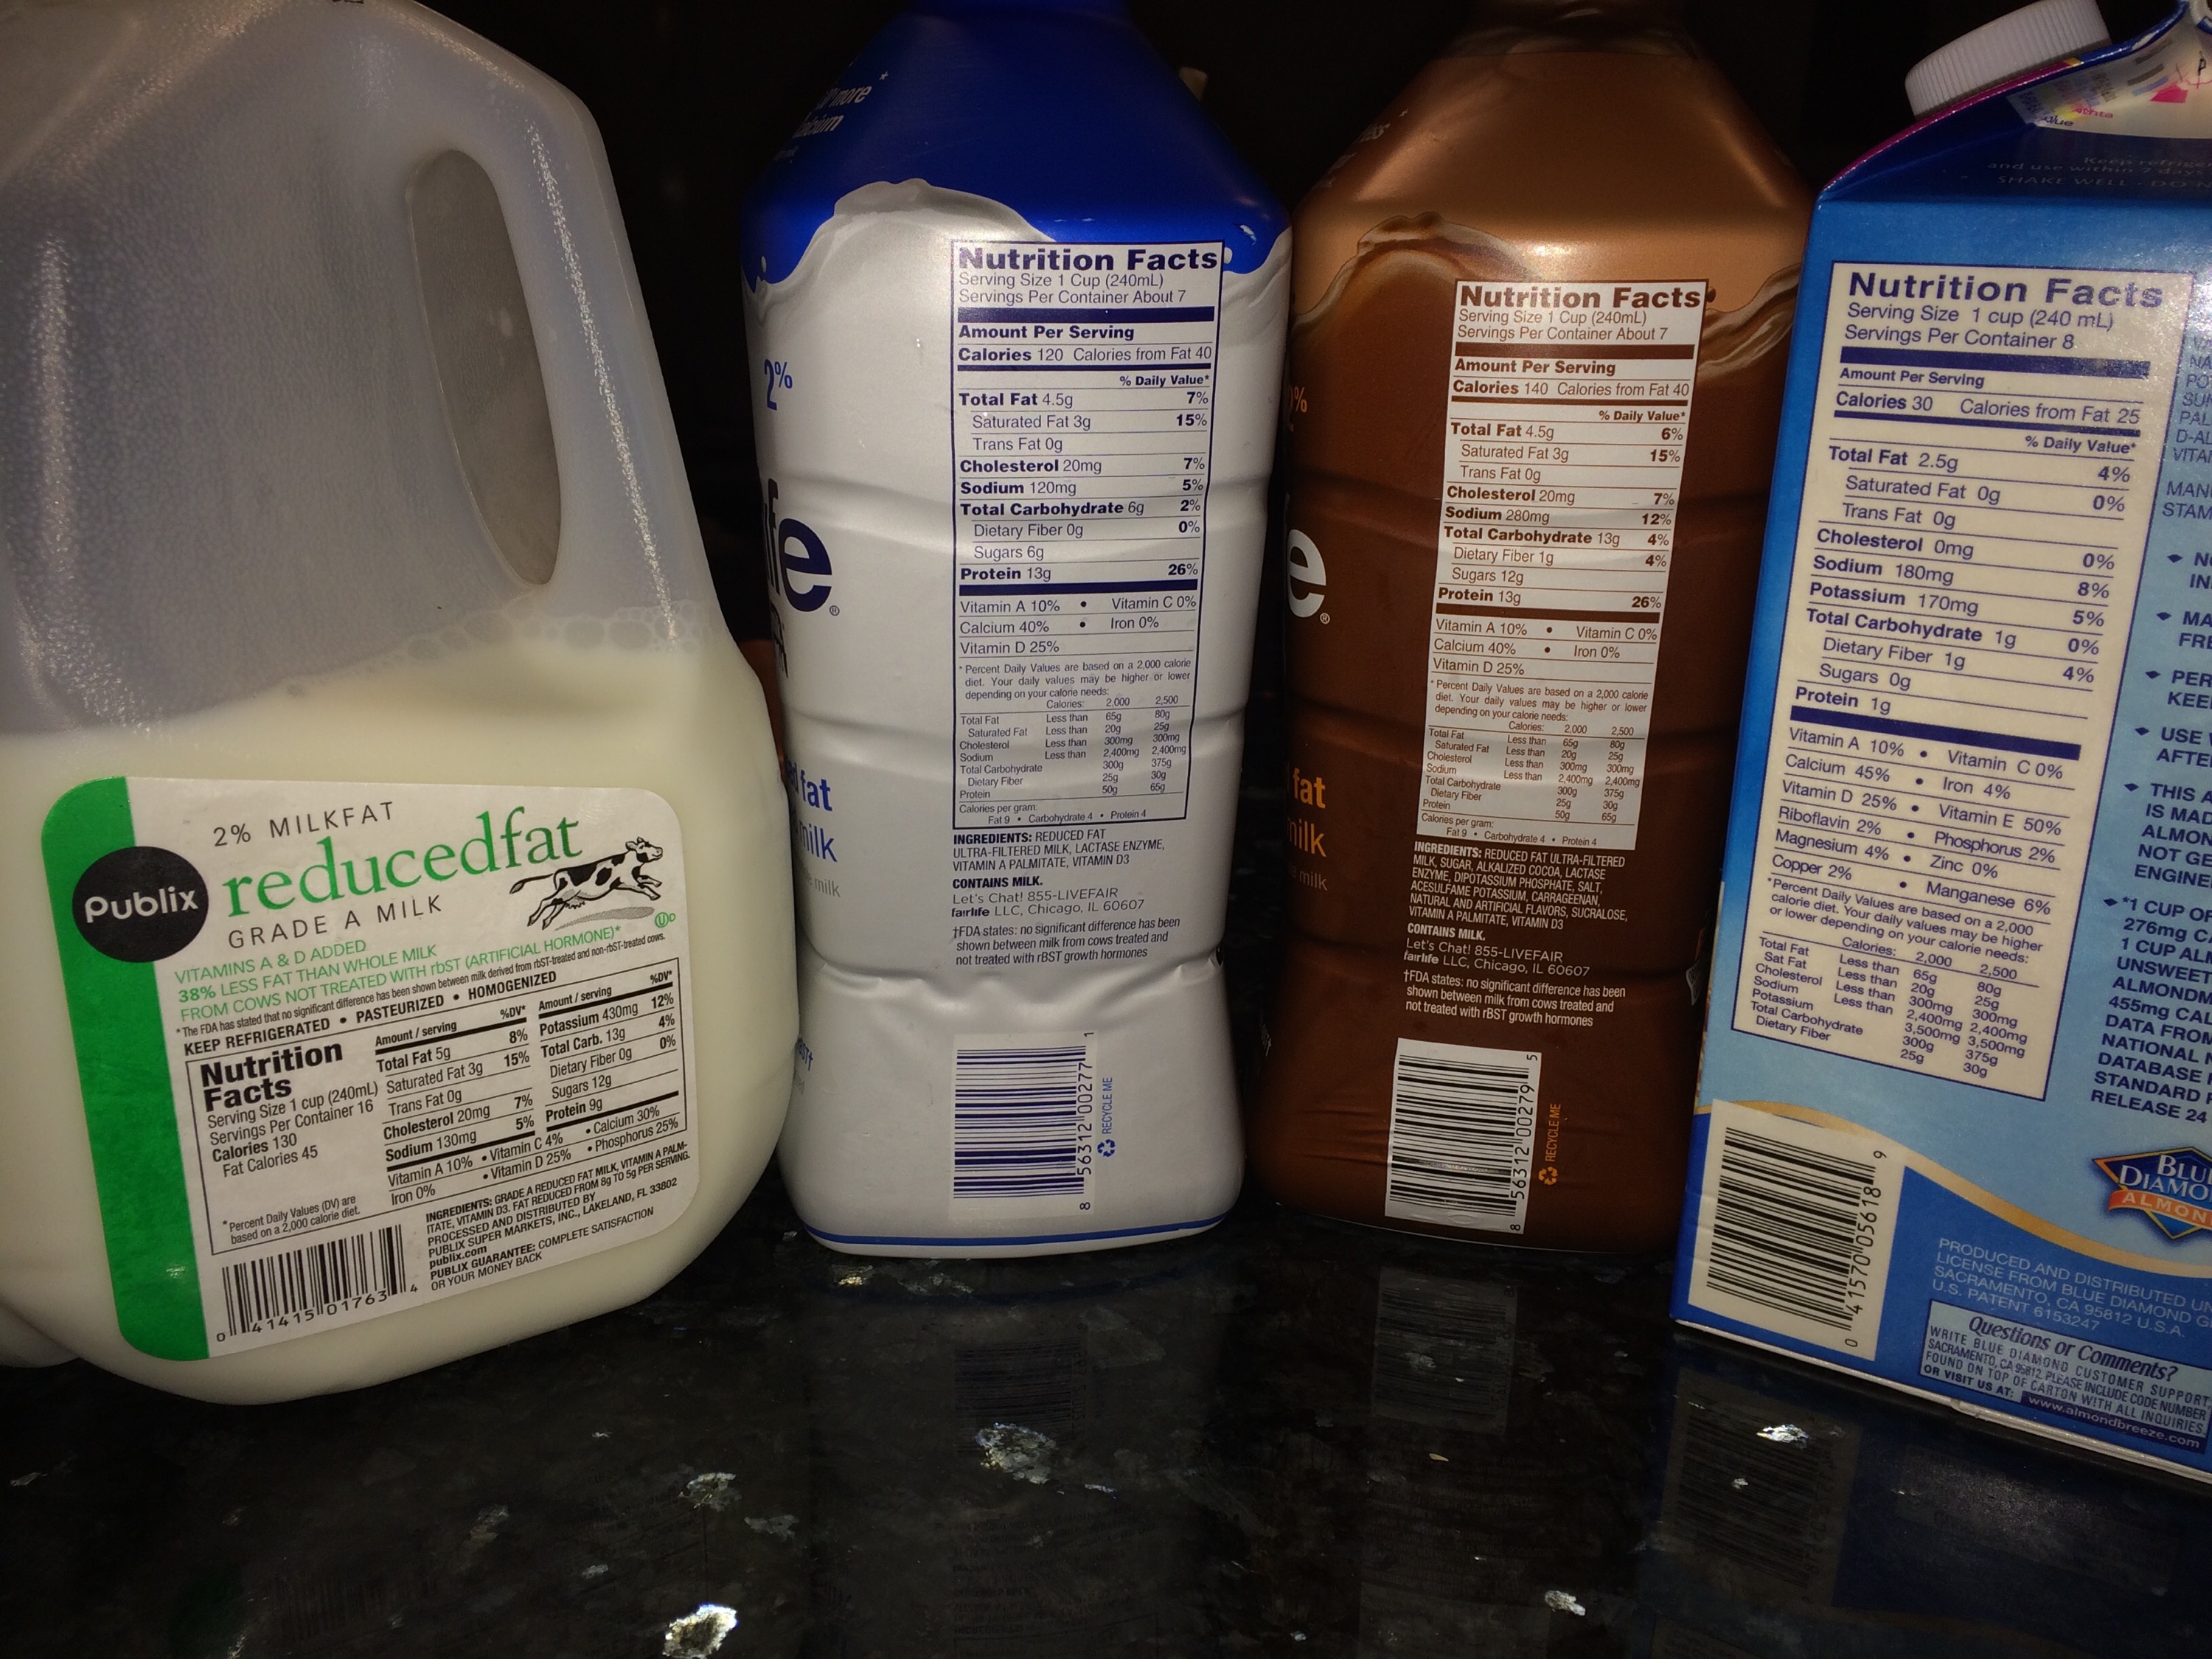
Unsweetened Almond milk, by far, has the lowest values at 30 calories per serving and 0 net carbs, but only 1 protein.  The FairLife has 13g.  

As you can see by the picture, I use a mix of products.  My use of alternative products increases as the price drops, so I’m hoping it isn’t long till we only buy FairLife.

Check them out!  Enjoy. 

Almond Meal Cookies

Everyone likes chocolate chip cookies. Not everyone wants to use regular white flour and some need to be gluten free. Hodgson  Mills aldond flourTruvia brown sugar blendHersheys sugar free chocolate chip

This recipe uses Hodgson Mill Almond flour/meal, Truvia brown sugar blend, and Hershey’s sugar free chocolate chips.   

Everyone loved these cookies! They were gone in mere minutes.


This is not a low calorie food, nor especially low carb, but is pretty low sugar at 2.6 grams per cookie. 

Ingredients 

   2 cups almond flour
  1/4 cup brown sugar 
   2 tbsp softened butter
   2 tsp vanilla extract
  1/2 tsp baking powder
  1/4 tsp salt
   1 large egg
  1/2 cups chocolate chips 

Directions 

  1. Preheat oven to 350°
  2. Line cookie sheet with parchment paper. Parchment paper is highly recommended because these cookies can be fragile and need an easy release.
  3. Mix all ingredients together except the chocolate chips.
  4. Add the chocolate chips. 
  5. Scoop about 1 teaspoon of dough onto prepared cookie sheet.  
  6. Flatten and shape cookies to about 2″ diameter.   
  7. Bake for 12-14 minutes, until golden brown. Allow cookies to cool before removing.

Yields 12 cookies


 Nutritional information per cookie (based on products used)
155 Calories
  11 Fat
  12 Carbs
    1 Fiber
 2.6 Sugar
 3.8 Protein 

What to do with red cabbage.

Red cabbage has a great refrigerator life, so it’s easy to keep on hand. Everyone has probably had a mixed salad with a bit of shredded cabbage and carrot for color, but what else does one do with a whole red cabbage?

There is a small restaurant chain in California, Clearman’s Restaurants and their North Woods Inn offers a red cabbage salad that is fantastic!  I will note that everything at North Woods Inn is fantastic, but the best is their blue cheese dressing salad. 

Tonight my husband treated us to a great dinner and he used red cabbage!  He diced red cabbage and onion, added some fresh shredded ginger, then tossed with just a little sesame ginger sauce.  Crazy good!  

Topped with cod and drizzled with a bit of the sesame ginger sauce.  Side vegetables were long sliced carrots and asparagus.

If you have other ideas or recipes for red cabbage please send them in! 


Cauliflower Pizza Crust

If you are looking for lower carb or no grain options in your meals, this recipe for a pizza crust is a surprising substitute.  It has goat cream cheese in it, and that gives it a tangy, but mellow flavor.
 IMG_9046

Sundays seem to be a day of interesting recipes.   I had read this recipe before the last shopping trip and had picked up the goat cream cheese that is called for.  All the other ingredients are generally on hand anyway.

While it may be possible to make 1 big pizza, I suggest making 4 individual pizzas
    Ingredients:

  • 1 medium-size cauliflower, grated or finely ground in a food processor.
  • 3.5 ounces goat’s cream cheese
  • 1 egg
  • Salt and black pepper

IMG_9024IMG_9026


  1. Preheat oven to 400F and line a baking tray with baking parchment.
  2. To make the crust, add the cauliflower to a pot of boiling water and boil for 5 minutes.
  3. Drain, then wrap in a thin towel or cheese cloth and squeeze out any excess water.  I placed my towel in a colander and then twisted the towel to squeeze out the water.  Note! The towel gets very hot soaking up the boiling water.IMG_9030IMG_9028
  4. In a bowl, mix the grated cauliflower with the cream cheese and egg, and season.  Do this while the cauliflower is still hot so that the cream cheese melts and mixes easily. IMG_9031
  5. Divide the cauliflower mix into four portions and, using your hands, shape the crusts on the sheet. They should be about 1/2 inch thick. Bake for about 30-35 minutes, or until firm and golden. IMG_9033IMG_9032
  6. While the crusts are baking, prep your favorite toppings.  I diced up 1 left over BBQ chick breast, 2 turkey sausage patties, 1 whole garlic (~6 cloves), a couple small tomatoes, and shredded some Colby cheese. IMG_9034IMG_9036
  7. When the pizza crusts are ready, spread about 1 tablespoon sauce around and close to the edge.  I used ready made pizza sauce.  Add the rest of your toppings.IMG_9043IMG_9042
  8. Bake the pizzas for about 10 minutes at 450F, until the cheese is golden.
  9. Let pizzas set for a few minutes before serving.IMG_9046 IMG_9061


Original recipe by Josephine Malene Kofod, atastylovestory.com

Paleo Low Carb Crepes

Servings: 10

Ingredients:
6 large eggs
1 cup unsweetened almond milk or other non dairy milk
3 tbsp coconut flour, sifted
2 tsp coconut oil, melted, plus 2 tbsp for the pan
1/4 tsp sea salt

Directions:

          1. Whisk together the crepe ingredients in a bowl. Let sit for 10 minutes while the pan heats so the coconut flour can absorb the liquid, then whisk again.
          2. Heat a crepe pan or enameled skilled over the medium-high heat.
            I found this heat too high for my pans, I used med-low instead.
          3. Place 1 tablespoon of the coconut oil in the pan, swirling to coat the bottom and sides.
          4. 1/4 cup batter swirled around pan
            1/4 cup batter swirled around pan

            Pour ¼ cup of the batter into the hot pan, turning the pan in a circular motion with one hand so the batter spreads thinly around the pan. Alternatively, very quickly use a spatula to spread the batter. Fill any holes with a drop of batter, making sure the pan is fully covered.

          5. Cook for 1 minute, until the edges start to lift. Gently work a spatula under the crepe and flip it over. Cook on the second side for 15 seconds and turn out onto a plate.
            IMG_8925
            Rolling crepe to loosen from pan without tearing

            This took a little longer since I used a lower heat, but I was able to manage it better.  
            My added tip: If you have a pan like mine that seems to have a ‘hot spot’ where everything tends to stick, then I suggest that after gently working spatula under edge of crepe, roll the crepe up to be sure it is fully released from your pan, then unroll and flip.


          6. Continue with the remaining batter, stacking the crepes on the plate as you work. Add a little more oil to the pan after about every 3 to 4 crepes if they begin to stick.

Thanks to Steven and Chris at LiveWell Network for posting this recipe from Against All Grain: Delectable Paleo Recipes to Eat Well & Feel Great, by Danielle Walker  http://livewellnetwork.com/Steven-and-Chris/recipes/Paleo-Crepes/9304914